Use Recycled & Reused Materials
1. Chess/Checkerboard Table
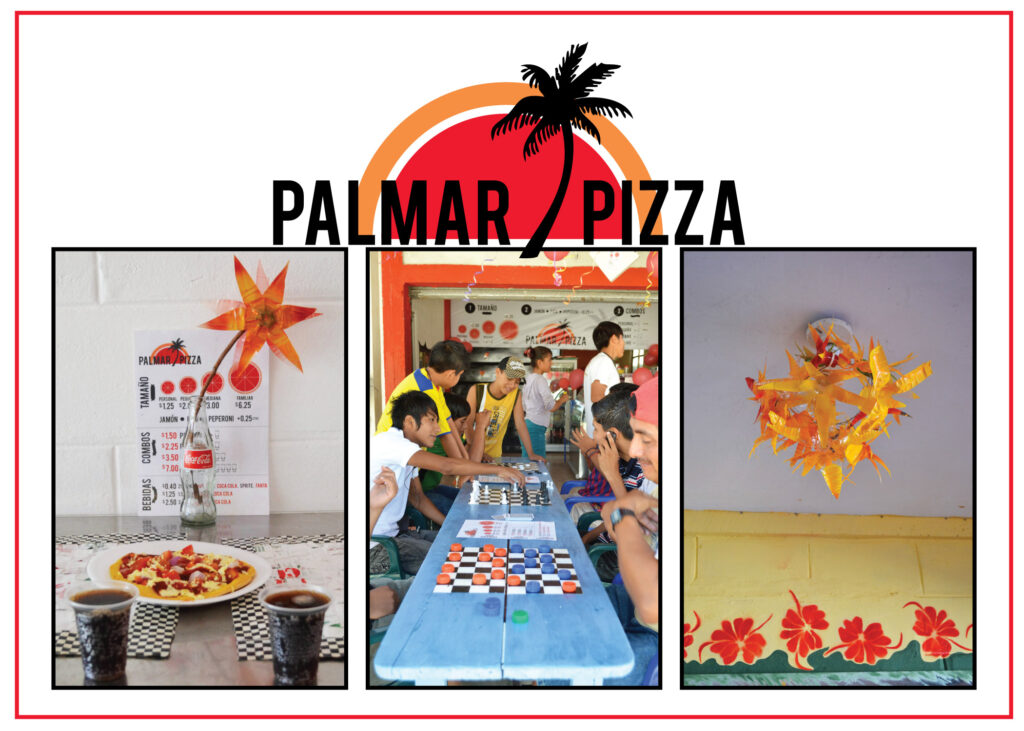
One of the things I recall fondly from my pizza-eating youth was playing games at Papa Gino´s pizza while waiting to eat. Papa Gino´s was where we went after soccer games and for birthday parties and the checkerboard tables were perfect for playing games with quarters. Well, in that same spirit Palmar Pizza is a place to eat and play.
It all started when we were taking an inventory on what furniture was available for us to use in the new venture, we found an old wooden table in storage. And by storage I mean on the open side porch of our counterpart´s building buried in weeds. Later, we learned that it is one of the last tables left from a former nursery school that operated out of the church across the street. It was donated to our counterpart´s organization years ago and was destined for the garbage truck. Now, it has been transformed to one of the most popular destinations this side of town center.

When Paul and I found the table (see above) we knew that with a little TLC it could become something special. That something special turned out to be a family style table with three chess/checkerboards painted on it. See below for images of each of the steps we took to transform this trash into treasure. After that, keep scrolling for images of the bottle chandelier project that was inspired by writing this post.
PAINT TABLETOP

We painted the entire tabletop since it was looking a little worn and uneven. Before we started we also re-nailed all of the legs on and sanded all surfaces. Then, I measured out three checkerboard surfaces – I guessed that about 4 cm was a good size for each of the boxes making the entire board 32 cm wide and tall. Then, with the help of a piece of cardboard I cut out to be a perfect 4 cm square, I taped off the first boxes for the board. It helped me to mark the boxes I was going to paint so I wouldn´t get confused.
PAINT BOXES

I painted the first part of black boxes and waited for them to dry. It didn´t take long and then I was ready for some of the teens at the youth center to help me pull off the painter´s tape. Then, I re-taped the boxes I couldn´t paint before and painted those black.
PEEL OFF TAPE

Make sure that the paint is completely dry before you peel off the tape. Also, when peeling try to peel at a 45 degree angle – the lines seem to come out cleaner that way.
FINISHING TOUCHES

It is inevitable that you will need to touch up the squares even if you peel the tape at a 45 degree angle. Do this with a very small brush and make sure you have both colors on hand – black and white – just in case! Finally, you´re ready to varnish the table. We had a nice sunny day, which helped to dry the table very quickly.
ENJOY!

2. Plastic Bottle Chandeliers
CUT BOTTLES

Cut bottles in half and cut out petal shapes from each side. Then, fold each of the petals down to form flower shape. We used a hammer and nail to make a small hole in the bottle half of the bottle since it didn´t have a hole.
PAINT THE FLOWERS

We used red and yellow spray paint.
USE WIRE TO FORM CHANDELIER

Paul created a circle shape out of wire and then we used small pieces of wire threaded through the bottle openings (and the nail holes we made) to twist the wire through and affix each flower to the wire circle.
HANG AND ENJOY!
